> ## Documentation Index
> Fetch the complete documentation index at: https://hoopdev-docs-improve-idp-sso-pages.mintlify.site/llms.txt
> Use this file to discover all available pages before exploring further.
# Access Control
> Control who can access which connections with group-based permissions
 ## What You'll Accomplish
Access Control lets you restrict which users can see and use specific connections. Instead of giving everyone access to everything, you can:
* Limit production database access to senior engineers
* Give read-only access to analysts
* Restrict sensitive systems to specific teams
* Automatically sync permissions from your identity provider
***
## How It Works
Access Control uses **groups** to manage permissions. Users belong to groups, and connections are configured to allow access from specific groups.
User logs in via your identity provider (Okta, Auth0, etc.)
User's group memberships are synced from the identity provider
When accessing a connection, Hoop checks if the user's groups are allowed
User sees the connection if allowed, or gets an access denied error
### Example
| User | Groups | Can Access |
| ----- | ----------------------- | --------------------------- |
| Alice | `engineering`, `senior` | prod-db, staging-db, dev-db |
| Bob | `engineering` | staging-db, dev-db |
| Carol | `analytics` | analytics-db (read-only) |
| Dave | `support` | support-db |
***
## Quick Start
## Prerequisites
To get the most out of this guide, you will need to:
* Either [create an account in our managed instance](https://use.hoop.dev) or [deploy your own hoop.dev instance](/setup/deployment/overview)
* You must be your account administrator to perform the following actions
- Groups configured in your identity provider
- Admin access to configure connections
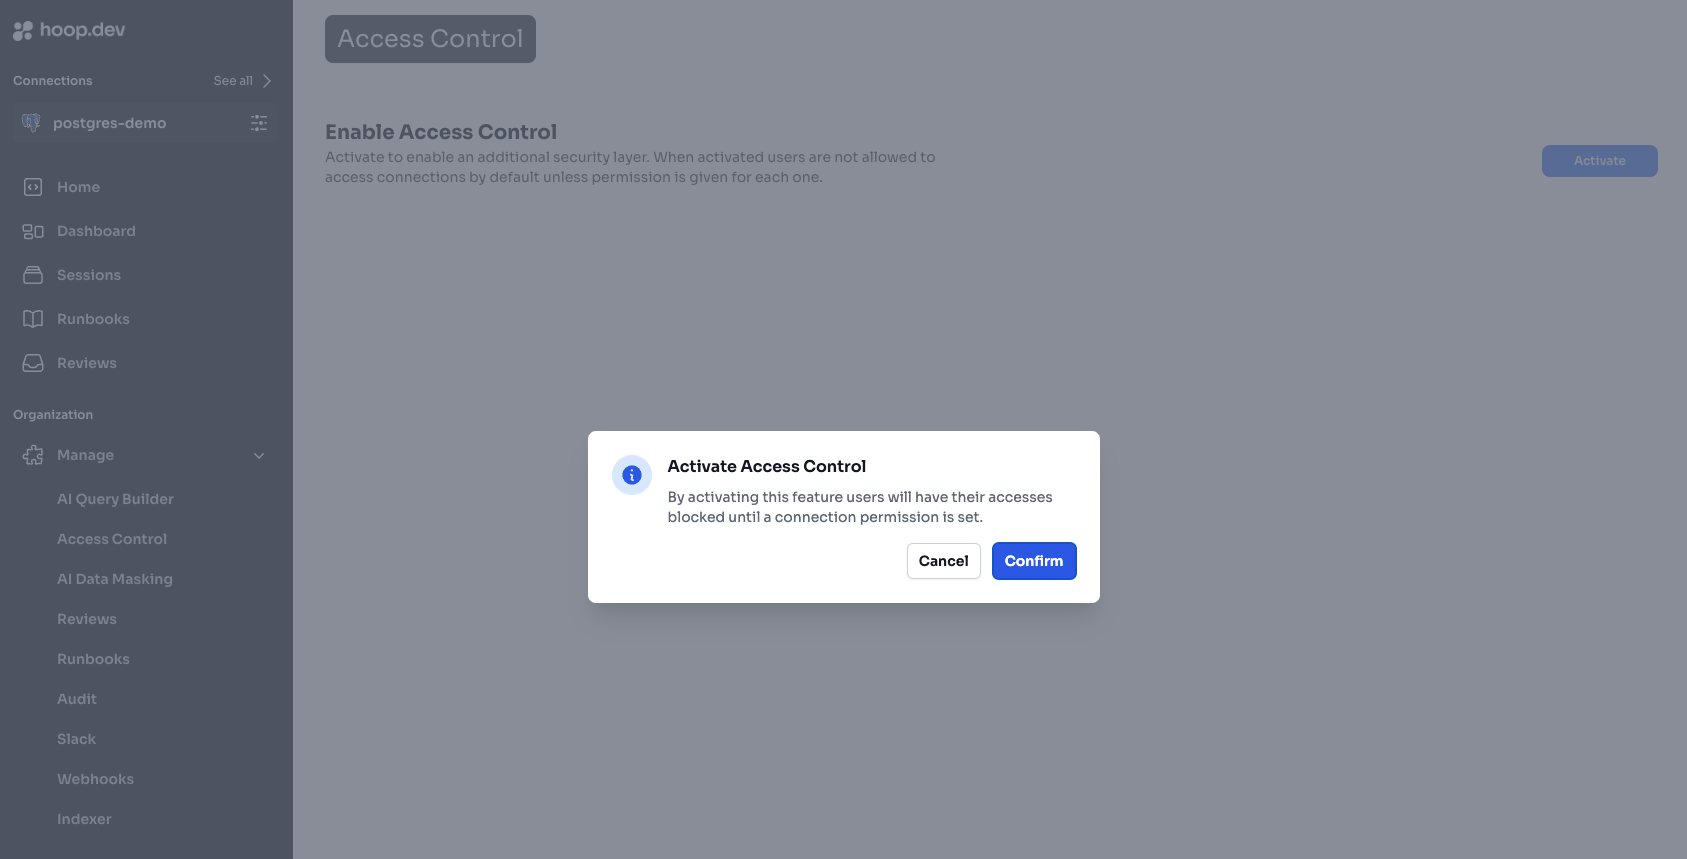
### Step 1: Enable Access Control
Enabling Access Control will hide connections from users who don't have explicit access. Plan your group assignments before enabling.
Go to **Manage > Access Control** in the sidebar
Click **Activate** to enable the feature
## What You'll Accomplish
Access Control lets you restrict which users can see and use specific connections. Instead of giving everyone access to everything, you can:
* Limit production database access to senior engineers
* Give read-only access to analysts
* Restrict sensitive systems to specific teams
* Automatically sync permissions from your identity provider
***
## How It Works
Access Control uses **groups** to manage permissions. Users belong to groups, and connections are configured to allow access from specific groups.
User logs in via your identity provider (Okta, Auth0, etc.)
User's group memberships are synced from the identity provider
When accessing a connection, Hoop checks if the user's groups are allowed
User sees the connection if allowed, or gets an access denied error
### Example
| User | Groups | Can Access |
| ----- | ----------------------- | --------------------------- |
| Alice | `engineering`, `senior` | prod-db, staging-db, dev-db |
| Bob | `engineering` | staging-db, dev-db |
| Carol | `analytics` | analytics-db (read-only) |
| Dave | `support` | support-db |
***
## Quick Start
## Prerequisites
To get the most out of this guide, you will need to:
* Either [create an account in our managed instance](https://use.hoop.dev) or [deploy your own hoop.dev instance](/setup/deployment/overview)
* You must be your account administrator to perform the following actions
- Groups configured in your identity provider
- Admin access to configure connections
### Step 1: Enable Access Control
Enabling Access Control will hide connections from users who don't have explicit access. Plan your group assignments before enabling.
Go to **Manage > Access Control** in the sidebar
Click **Activate** to enable the feature
 ### Step 2: Configure Connection Access
Find the connection you want to configure and click on it
Enable the Access Control toggle for this connection
### Step 2: Configure Connection Access
Find the connection you want to configure and click on it
Enable the Access Control toggle for this connection
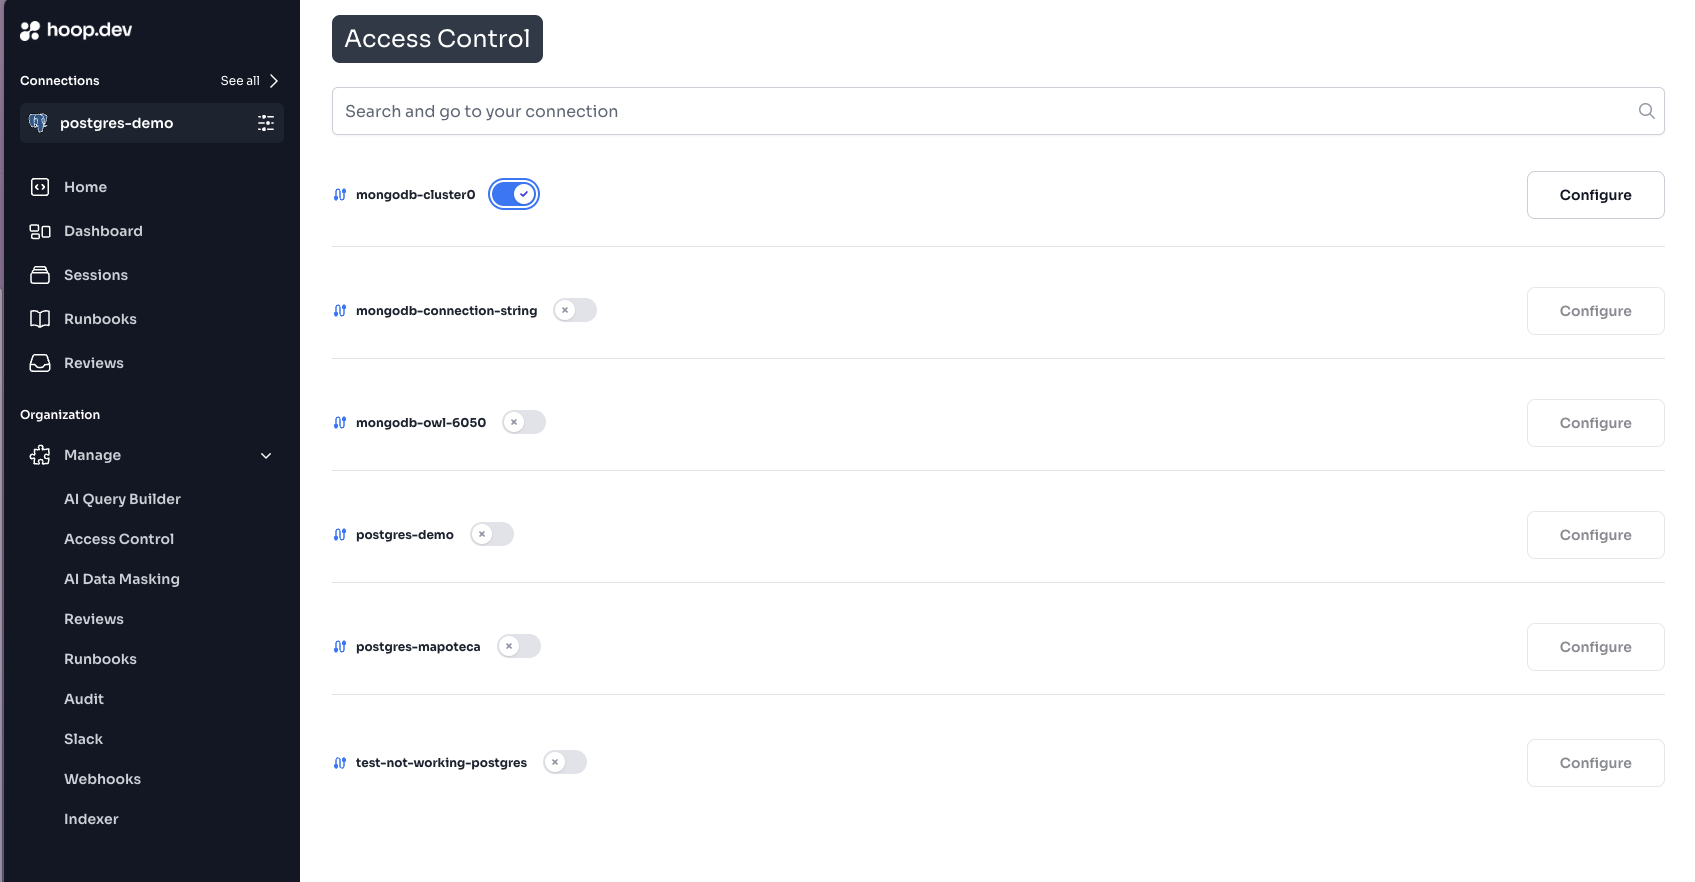 Choose which groups can access this connection
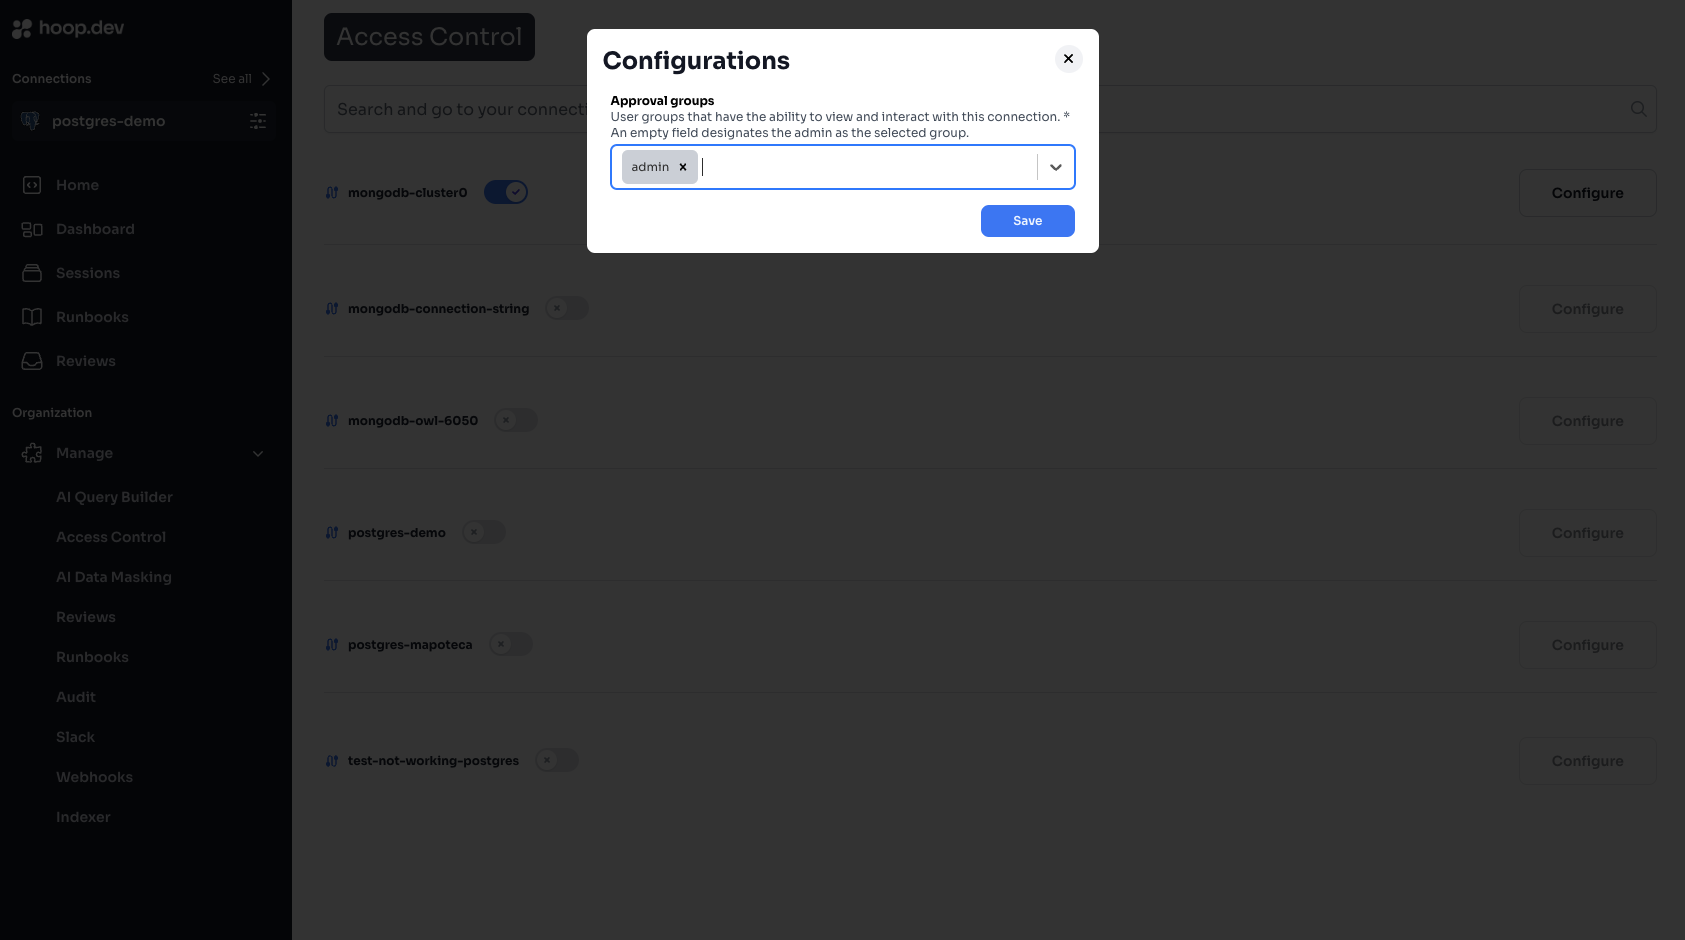 Click **Save** to apply the changes
### Step 3: Verify Access
1. Log in as a user in one of the allowed groups
2. Verify you can see and access the connection
3. Log in as a user NOT in the allowed groups
4. Verify the connection is not visible
***
## Managing Groups
### Creating Groups
Groups are typically managed in your identity provider (Okta, Auth0, Azure AD, etc.). When users log in, their group memberships are synced to Hoop.
**In Hoop, you can also create groups manually:**
1. Go to **Manage > Users & Groups**
2. Click **Create Group**
3. Enter a group name (e.g., `prod-access`)
4. Add users to the group
### Syncing Groups from Identity Provider
Configure your identity provider to include groups in the ID token:
1. Add a `groups` claim to your OIDC configuration
2. Map your IdP groups to Hoop groups
3. See [Identity Provider Configuration](/setup/configuration/idp/get-started) for detailed setup
### Built-in Roles
| Role | Description |
| --------- | ------------------------------------------- |
| `admin` | Full access to all connections and settings |
| `auditor` | Read-only access to sessions and audit logs |
Admin users bypass Access Control and can access all connections. Use admin sparingly.
***
## Common Patterns
### Pattern 1: Environment-Based Access
Restrict production access to senior team members:
| Connection | Allowed Groups |
| ---------- | ---------------------------- |
| prod-db | `senior-engineers`, `dba` |
| staging-db | `engineering` |
| dev-db | `engineering`, `contractors` |
### Pattern 2: Team-Based Access
Each team only sees their own resources:
| Connection | Allowed Groups |
| ------------ | -------------------------------- |
| payments-db | `payments-team` |
| inventory-db | `inventory-team` |
| analytics-db | `analytics-team`, `data-science` |
### Pattern 3: Role-Based Access
Different access levels for different roles:
| Connection | Allowed Groups |
| ----------------- | ------------------------ |
| prod-db-readwrite | `dba` |
| prod-db-readonly | `engineering`, `support` |
| prod-db-analytics | `analytics` |
Create multiple connections to the same database with different credentials for different access levels.
### Pattern 4: Contractor Access
Temporary access for external contractors:
1. Create a `contractors` group
2. Add contractors to the group
3. Only allow `contractors` group on specific, limited connections
4. Remove from group when contract ends
***
## Combining with Other Features
Access Control works with other Hoop security features:
| Feature | Combined Behavior |
| --------------------- | -------------------------------------------------------- |
| **Access Requests** | Users in allowed groups can request access; others can't |
| **Guardrails** | Allowed users still subject to query restrictions |
| **Live Data Masking** | Allowed users see masked data |
| **Session Recording** | All access is audited regardless of permissions |
### Example: Layered Security
For a production database:
1. **Access Control:** Only `senior-engineers` can see the connection
2. **Access Requests:** Require JIT approval before connecting
3. **Guardrails:** Block `DROP TABLE` and `DELETE` without WHERE
4. **Live Data Masking:** Redact PII in query results
5. **Session Recording:** Log all queries for audit
***
## Troubleshooting
### User Can't See a Connection
**Check:**
1. Access Control is enabled on that connection
2. User's groups are in the allowed list
3. User has logged out and back in (to sync groups)
4. Identity provider is sending the `groups` claim
**Debug group membership:**
1. Go to **Manage > Users**
2. Find the user and click to view details
3. Check their group memberships
### User Sees Connection But Can't Connect
This is likely an Access Request or Guardrail issue, not Access Control. Check:
1. Is JIT or Action Access Request enabled?
2. Are there Guardrails blocking the connection?
### Groups Not Syncing from IdP
**Check:**
1. `groups` claim is configured in your IdP
2. The OIDC scope includes `groups`
3. Gateway environment variables are correct
4. See [Identity Provider Configuration](/setup/configuration/idp/get-started)
***
## Best Practices
Grant minimum access needed for each role
Assign access to groups, not individual users
Review access permissions quarterly
Write down who should have access to what
### Access Review Checklist
Quarterly, review:
* [ ] Are all group memberships still appropriate?
* [ ] Are there users who left but still have access?
* [ ] Are there connections that should have stricter access?
* [ ] Are contractors' access limited to their engagement period?
***
## Next Steps
Detailed configuration options
Set up SSO and group sync
Add approval workflows
Block dangerous operations
Click **Save** to apply the changes
### Step 3: Verify Access
1. Log in as a user in one of the allowed groups
2. Verify you can see and access the connection
3. Log in as a user NOT in the allowed groups
4. Verify the connection is not visible
***
## Managing Groups
### Creating Groups
Groups are typically managed in your identity provider (Okta, Auth0, Azure AD, etc.). When users log in, their group memberships are synced to Hoop.
**In Hoop, you can also create groups manually:**
1. Go to **Manage > Users & Groups**
2. Click **Create Group**
3. Enter a group name (e.g., `prod-access`)
4. Add users to the group
### Syncing Groups from Identity Provider
Configure your identity provider to include groups in the ID token:
1. Add a `groups` claim to your OIDC configuration
2. Map your IdP groups to Hoop groups
3. See [Identity Provider Configuration](/setup/configuration/idp/get-started) for detailed setup
### Built-in Roles
| Role | Description |
| --------- | ------------------------------------------- |
| `admin` | Full access to all connections and settings |
| `auditor` | Read-only access to sessions and audit logs |
Admin users bypass Access Control and can access all connections. Use admin sparingly.
***
## Common Patterns
### Pattern 1: Environment-Based Access
Restrict production access to senior team members:
| Connection | Allowed Groups |
| ---------- | ---------------------------- |
| prod-db | `senior-engineers`, `dba` |
| staging-db | `engineering` |
| dev-db | `engineering`, `contractors` |
### Pattern 2: Team-Based Access
Each team only sees their own resources:
| Connection | Allowed Groups |
| ------------ | -------------------------------- |
| payments-db | `payments-team` |
| inventory-db | `inventory-team` |
| analytics-db | `analytics-team`, `data-science` |
### Pattern 3: Role-Based Access
Different access levels for different roles:
| Connection | Allowed Groups |
| ----------------- | ------------------------ |
| prod-db-readwrite | `dba` |
| prod-db-readonly | `engineering`, `support` |
| prod-db-analytics | `analytics` |
Create multiple connections to the same database with different credentials for different access levels.
### Pattern 4: Contractor Access
Temporary access for external contractors:
1. Create a `contractors` group
2. Add contractors to the group
3. Only allow `contractors` group on specific, limited connections
4. Remove from group when contract ends
***
## Combining with Other Features
Access Control works with other Hoop security features:
| Feature | Combined Behavior |
| --------------------- | -------------------------------------------------------- |
| **Access Requests** | Users in allowed groups can request access; others can't |
| **Guardrails** | Allowed users still subject to query restrictions |
| **Live Data Masking** | Allowed users see masked data |
| **Session Recording** | All access is audited regardless of permissions |
### Example: Layered Security
For a production database:
1. **Access Control:** Only `senior-engineers` can see the connection
2. **Access Requests:** Require JIT approval before connecting
3. **Guardrails:** Block `DROP TABLE` and `DELETE` without WHERE
4. **Live Data Masking:** Redact PII in query results
5. **Session Recording:** Log all queries for audit
***
## Troubleshooting
### User Can't See a Connection
**Check:**
1. Access Control is enabled on that connection
2. User's groups are in the allowed list
3. User has logged out and back in (to sync groups)
4. Identity provider is sending the `groups` claim
**Debug group membership:**
1. Go to **Manage > Users**
2. Find the user and click to view details
3. Check their group memberships
### User Sees Connection But Can't Connect
This is likely an Access Request or Guardrail issue, not Access Control. Check:
1. Is JIT or Action Access Request enabled?
2. Are there Guardrails blocking the connection?
### Groups Not Syncing from IdP
**Check:**
1. `groups` claim is configured in your IdP
2. The OIDC scope includes `groups`
3. Gateway environment variables are correct
4. See [Identity Provider Configuration](/setup/configuration/idp/get-started)
***
## Best Practices
Grant minimum access needed for each role
Assign access to groups, not individual users
Review access permissions quarterly
Write down who should have access to what
### Access Review Checklist
Quarterly, review:
* [ ] Are all group memberships still appropriate?
* [ ] Are there users who left but still have access?
* [ ] Are there connections that should have stricter access?
* [ ] Are contractors' access limited to their engagement period?
***
## Next Steps
Detailed configuration options
Set up SSO and group sync
Add approval workflows
Block dangerous operations